Rabbit Run
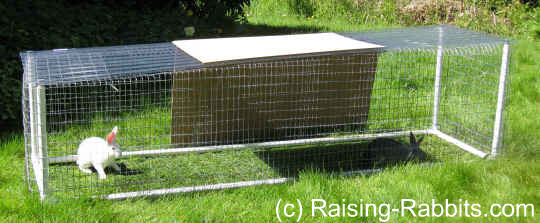
Rabbit Run: Free directions for an easy-to-build rabbit pen or run using welded cage wire and PVC. In this rabbit run,
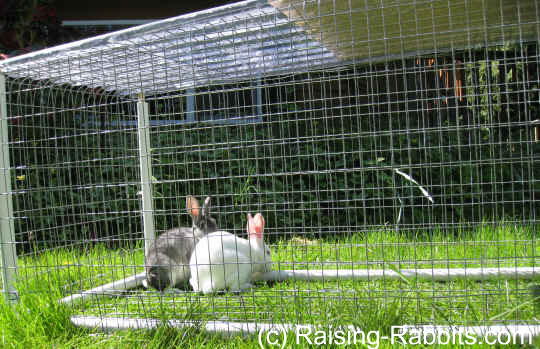
you can house your rabbit on grass and save money on feed, or exercise your pet
or meat rabbits.
To keep it simple, we based this run on the dimensions of an 8-foot corrugated plastic roofing panel. We built the frame out of 1-inch PVC and used 3/4-inch dowel rods to help secure it to the rabbit pen.
If you need help: We incorporated this rabbit run plan in detail into our several cage-building e-books, including the Pet Rabbit Living Spaces e-book.
The free rabbit run plans are on this page below.
Pet Rabbit Living Spaces

Pet Rabbit Living Spaces is our collection of exclusive and luxurious DIY plans for building your own rabbit cages, hutches, runs, and pens. Included are never-before published plans, specifically designed for pet rabbit owners.
One of our indoor rabbit cage plans even features tall legs on a PVC frame so you and your kids can enjoy their rabbits nearly face-to-face.
Pet Rabbit Living Spaces is
available as an instant-download e-book. It's a hands-on, do-it-yourself manual of plans and instructions for creating a variety of rabbit homes and exercise spaces for pet rabbits, both indoors and outside. It is full of pictures and illustrations so we could over-deliver on
value.
Click the photo or go to Build Your Own Rabbit Cage to learn more!
We also designed a 4-foot-wide rabbit pen/run with wheels. Both run designs can be found in the DIY Livestock Rabbit Housing e-book (and they are also in Ideal DIY Rabbit Cages, of course!)
Ideal DIY Rabbit Cages includes every detail and plan presented in the Pet Rabbit Living Spaces e-book, and the DIY Livestock Rabbit Housing e-book. A single volume giving you the whole shebang!
DIY Livestock Rabbit Housing

For Homesteaders and Meat Rabbit Raisers: The DIY Livestock Rabbit Housing e-book offers a large choice of plans for cages, hutch frames, rabbit tractors, runs, and pens specifically designed for those who are raising more than just a few rabbits for show or livestock.
Who says you can't build rabbit cages? With the right tools, materials, and instructions, cage building is not complicated at all. If I can build them, YOU can build them. These are QUALITY cages - build them yourself and save a ton of money!
Got questions? There are many photos accompanying every plan, including all the tools and supplies you need to build everything.
Click the pic or this link for more information!
Ideal DIY Rabbit Cages includes every detail and plan presented in both of the e-books presented above - the pet housing e-book, and the DIY Livestock Rabbit Housing e-book. A single volume of ALL the plans we've built and have been using successfully over the years!
Ideal DIY Rabbit Cages

Who says you can't build rabbit cages? With the right tools, materials, and instructions, cage building is not complicated at all. If I can build them, YOU can build them, and save a ton of money! I dare say you'll save double or triple the cost of this e-book with the very first cage built.
These are QUALITY cages you'll be building: much nicer and safer for your rabbits than cages cobbled together with cheap hardware cloth stapled to wooden boards. Got questions? See the many photos accompanying every plan, including all the tools and supplies you need to build everything.
Ideal DIY Rabbit Cages contains ALL the Raising Rabbits plans for cages, hutch frames, rabbit tractors, runs, pens, and more.
Click the pic or this link for more information, or...
Visit our store to purchase Ideal DIY Rabbit Cages!
Don't want to build your own rabbit run? Hostile Hare will do it for you...
Here are the Rabbit Run Plans
MATERIALS:

Frame:
- 1 inch Schedule 40 (or better yet - Sch. 80) PVC - 27 feet, cut as follows:
- 20" - 2 pc
- 22" - 2 pc
- 24" - 2 pc
- 90" - 2 pc
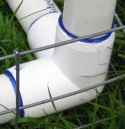
- Y-connectors - 4 (pictured)
- Red Hot Blue Glue
Wire:
- 2 in. x 4 in. galvanized wire (sometimes called hardware cloth). Wire measurements will be roughly 34 inches wide by 104 inches (8 ft 4 inches) long. Depending on the height of the roll of wire (I had some used stuff on hand), you may have to piece it together using J-clips)
- 1 in. x 2 in. x 36 in. galvanized wire. You’ll need approximately 22 feet (8 feet on both sides, and 26 inches at each end plus any losses from cutting). Cut it into manageable pieces if you wish, or try wrestling a long piece into submission
- J-clips, J-clip pliers, wire-cutters
- 1 clear panel corrugated plastic roofing (dimensions = 26 1/4 inches wide by 8 feet long)
- 3/4 in. or 7/8 in. wood dowel rod - 4 feet; cut into 4 lengths of 1 foot each
- 8 large metal washers
- 4 wood screws, 1 1/4 in. long
- Drill and bit
If you cannot find cage wire, tools, and j-clips in your area, here and below are links to excellent tools and rabbit cage wire which should work for you.
Three Sizes of Cage Wire Cover All Your Needs
Cage Wire Options
Flush-Cut Wire Cutters are the Best!
Avoid Jagged Wire Ends that Feel Like Spears by Using Flush-Cut Wire Cutters
Build the PVC Frame for the Run

- Cut PVC to lengths specified in Materials. Sand any burrs.
- Glue according to diagram
- Note: one side is taller than the other, in order to allow for easy drainage in rainy weather. Be sure that the long legs are both at a skinny end, as the corrugation runs long-wise. Also, with one end shorter, you may find it easier to access your bunnies from the short end.
Either of these J-Clip Pliers is Top Quality - should last 20+ years
Easily Remove a Misapplied J-Clip with Remover Pliers
Assemble Wire for Rabbit Run:
- Bend 4 inches of the bottom, 2" x 4" wire upward, all the way around the perimeter. Clip the overlap at the corners and fasten with J-Clips. This is to add stability, give more area for fastening the side wire, and to hopefully make the rabbit run a little bit more sturdy and predator-safe.
- Note: if you use livestock wire [4" x 4"] you will run a huge risk of escapees, even if only on the floor.
- Place the PVC frame in the basket you’ve formed with the 2" x 4" wire.
- Circle the PVC rabbit run frame with 1" x 2" x 36" wire. Fasten to the 2" x 4" floor wire liberally with J-Clips, at least every 4 inches.
It will be way too tall.
- Cut away wire at corners as shown in photo.
- Turn the rabbit run on its side.
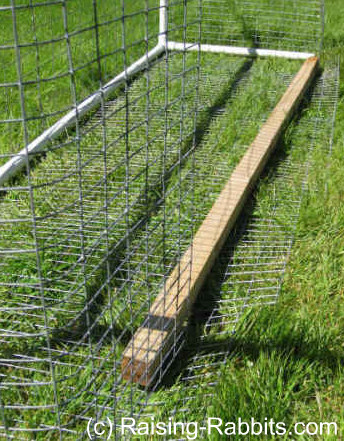
- Place a length 2 x 2 (or 2 x 4) board long enough to describe an imaginary line drawn from the top of a 24-inch leg to the top of a 20-inch leg. The board is only to provide you a straight edge against which to easily bend the wire upward (toward the middle of the rabbit run) forming a small portion of the roof.
- Cut and remove the extra wire, allowing for roughly 4 - 6 extra inches (see picture) to serve as a partial roof to support the corrugated panel
- Bend wire to 90 degrees.
- Repeat for the other side
- Bend the wire at the short ends of the rabbit run as well.
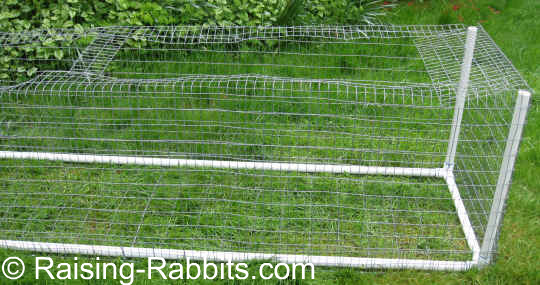
- From the discarded wire, cut a 4-inch wide strip to serve as a stabilizer across the top at the middle, and bend end wires to fasten tightly. See picture.
- The extra lengths of wire are to give stability to the corrugated plastic panel. It’d be rather wobbly without the wire to rest on. Bending it inward, will also, I hope, discourage curiosity from predators.
J-Clips - 1 pound or 2 pounds
Create the Roof for the Run:
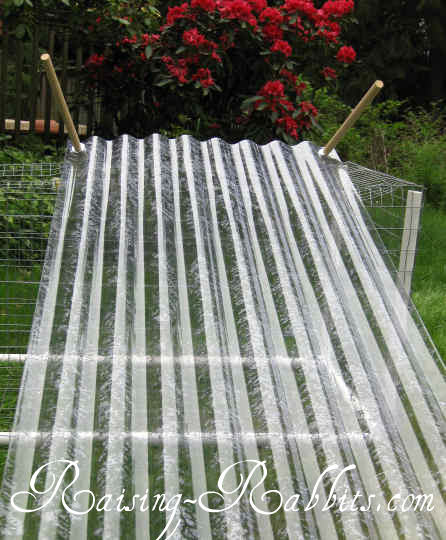
- Measure the distances between the PVC legs on-center, both lengthwise and width.
- Use these measurements to determine where to drill 4 holes in the corrugated panel, one at each corner.
- If you’ve used our measurements, you should be able to drill at the juncture of a 2-inch margin from the long ends and a 1 3/8-inch margin from the sides.
- Drill a pilot hole in one end of each of the four dowel rods
- Use 1 wood screw at each corner to attach a 1-foot length of dowel rod to a corner of the corrugated panel according to the picture:
- Washer
- Corrugated panel
- Washer
- Dowel
- We got the wood screws as tight as we possibly could, but you can see that the screws still protrude a bit from the dowel so the whole assembly is floppy. Tight - but floppy. Our pilot holes could have been bigger. But, we figure it is just fine this way, as the extra play makes it very easy to insert the dowels into the PVC legs.
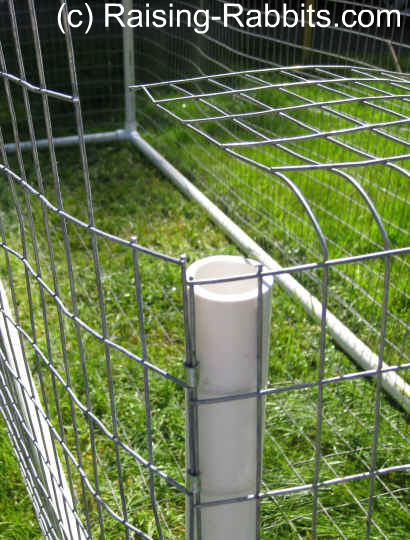
- And that is the next step - turn over the corrugated plastic so the dowels point downward and insert the dowels into the PVC legs. Having foot-long dowels should make it harder for wind to lift the roof off the rabbit run.
- If you plan to let rabbits ‘live’ in the rabbit pen as you move it around your lawn every day, then you’ll probably need to add strapping across the top, such as bungee cords, so no curious and dexterous raccoon-hands can pry the top off for a ‘free’ meal.
- Provide crocks for pellets and water, or do as we do - hang a J-feeder and use a 1-gallon Edstrom water tank, valve and tubing. Since the rabbits will have access to fresh green grass, their intake of pellets will drop significantly, as will their water intake. The fresh grass will provide lots of moisture.
- Since the PVC frame is light, you might also wish to drive tent pegs through the corners to fasten the rabbit run to the ground. Just another precaution in windy areas.
THERE, we’re done! All that probably took us a few hours, including the trip to the store to purchase parts.
As you use this run, don't forget...
- Predators
- Shade
Go to World of Raising-Rabbits to check out cage-building and other rabbit husbandry e-books by Raising-Rabbits.
Ready-Made Rabbit Runs
If you'd prefer to buy a very nice rabbit pen without the effort of constructing it, our friends at Hostile Hare build cages and a very nice rabbit run. They'll be happy to build one or more for you, and you'll love the excellent quality!
Where can I find top quality rabbit cages that are great for rabbit feet?
From Raising-Rabbits, of course!
Raising-Rabbits has partnered with Hostile Hare to bring you cages that exceed our rigorous rabbit housing standards.
We do not manufacture cages, but we sure recognize a well-built, predator-proof, baby-safe, bunny-feet-safe cage when we see it! We think Hostile Hare cages will serve you well for years.
Explore the choices by clicking the logo or this link!
Double-Value Guarantee
Our policy is to always OVER-deliver
on value,
which is why your purchase is fully covered by our
Double-Value
Guarantee.
Go ahead - take any of our e-books for a test drive. Peruse our detailed informational and educational e-books. Examine our plans for building rabbit cages, runs, or metal or PVC hutch frames. Check out the Rabbit Husbandry info e-books.
If you aren't completely satisfied that your e-book purchase is worth at least double, triple or even quadruple the price you paid, just drop us a note within 45 days, and we'll refund you the entire cost. That's our Double-Value Guarantee.
Note: When you purchase your
e-books, they will be in PDF format, so you can download them to any device that
supports PDF format. We advise making a back-up copy to a drive or cloud
account. If the books are lost, you can also purchase another copy from Raising-Rabbits.
* Affiliate Links*
As an affiliate of several companies, including Amazon.com, we earn from qualifying purchases. Your purchases from these affiliates come at no extra cost to you.
Bunny Bazaar!
Online Shopping Mall by Raising-Rabbits!

One-Stop Shop for Rabbit Swag for both Rabbits and Humans
Bunny Branola:
Immune-Boosting Rabbit Nutritional Supplement and Treat!

SIX delicious flavors - Sample packs available.
Yes! I want more info!
Yes, Buy Bunny Branola Now!
Raising Rabbits Sweatshirts, T-shirts, and Hoodies!
 |
 |
 |
Now offering classy, unisex Raising Rabbits sweatshirts and hoodies.
Available in a large assortment of colors! (We have unisex T-shirts too.)
Find these gorgeous garments in the Bunny Bazaar!
Order your own today - They make great gifts too!!
National Rabbit Associations
 Logo")
American Rabbit Breeders Association (ARBA) is the national club for breeders of both rabbits and cavies (guinea pigs) in the United States. Anyone can join for a modest fee, and get wonderful support for their rabbit raising efforts.

The British Rabbit Council - Official Website of the British Rabbit Council, whose mission is to support the interests of all British rabbit breeders, including exhibition, breeding, and welfare.

Rabbit Council of NZ (Inc.) - The New Zealand Rabbit Council provides a comprehensive website about Rabbit related issues and events within New Zealand and overseas.

Australian National Rabbit Council Inc. - "An Australian Rabbit Club for Australian Rabbit Owners." It was established in order to "coordinate and promote Rabbit Clubs and interest groups throughout Australia."
Featured Rabbitries:
Click the Rabbitry Name Links:
Canada, Quebec
MapleRidge Stables Rabbitry
Himalayan Rabbits
Arizona
Hostile Hare
Chinchillas, Cages
Illinois
Open Doors Rabbitry
Lionheads, New Zealands
Minnesota
Lops of Love Rabbitry
Closed for Christmas vacation
New Jersey
Belle's Bunny Boutique
Holland Lops & Mini Lion Lops
North Carolina
What The Fluffle Rabbitry
New Zealands, Champagnes
Breadbox Rabbitry
Netherland Dwarfs
Pennsylvania
Happily Ever After
Mini Plush Lops, Holland Lops,
Netherland Dwarf, Lionhead,
Mini Plush Lop, & Mini Rex
Bunnies by Emma and Ellie
Holland Lop, Mini Lop, Mini Plush Lop,
Mini Rex/Holland Lop Mix
South Carolina
Jubilee Farms
Holland Lops
Subscribe to Rabbit Rhythms,
our e-newsletter !
Get rabbit news, husbandry and health tips mostly every month. It's easy - we only need your email address, then hit the 'subscribe' button. Enjoy!
Recent Articles
-
Pet Rabbits: Confident Care, Feeding, and Enjoyment
Feb 14, 26 05:46 PM
 Pet rabbits: Care and feeding, including a critical-needs list of requirements. Confidently care for your bunnies with this list of rabbit care tips
 -
All rabbit breeds recognized in USA by American Rabbit Breeders Assoc.
Jan 02, 26 06:49 PM
 List of all rabbit breeds recognized by ARBA, along with weights, brief descriptions and link to national rabbit breed club if available
 -
About Ordering Raw Rabbit: Feeding Raw Can Be Easy
Dec 10, 25 05:10 PM
 About ordering raw rabbit: All the details and your questions answered about easily purchasing frozen raw rabbit from Raising-Rabbits.com for your dogs/cats.

Raising-Rabbits: Home of
The Rabbit Raising Problem Solver

$22.62 - includes
- 10% off your autographed copy of Rabbit Raising Problem Solver
- All packaging, handling, and Media Mail postage costs (WA residents are subject to sales tax)
- Applies to US addresses - (sadly, Media Mail is not offered for international shipping, not even for really awesome books)
- (International shipping is available, of course, but it's out of our control how much they charge for shipping. Send us your country, city, and area code to obtain a shipping quote.)
* Affiliate Links*
As an affiliate of several companies, including Amazon.com, we earn from qualifying purchases. Your purchases from these affiliates come at no extra cost to you.
