Rabbit Run
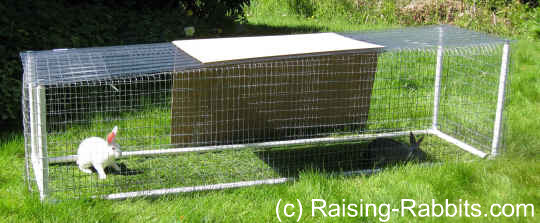
Rabbit Run: Free directions for an easy-to-build rabbit pen or run using wire and PVC. In this rabbit run,
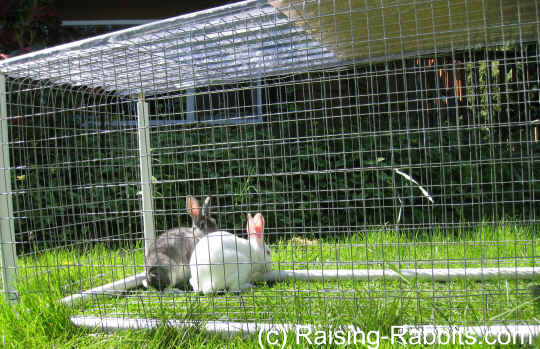
you can house your rabbit on grass and save money on feed, or exercise your pet
or meat rabbits.
To keep it simple, we based this run on the dimensions of an 8-foot corrugated plastic roofing panel. We built the frame out of 1-inch PVC and used 3/4-inch dowel rods to help secure it to the rabbit pen.
If you need help: We incorporated this rabbit run plan in greater detail into our Pet Rabbit Living Spaces e-book.

If you want to spoil your bun with their own custom designed space, check out our ebook:
This great ebook has tons of pictures, including all the tools and supplies you need to build everything. If your buns are pampered pets or show divas, this book has it all. Best yet: you can print off the pages you need to be a supply list for the hardware store, and an instruction manual out at the workbench when you are putting it together.
Pet Rabbit Living Spaces has plans for the cage, an outdoor run, a folding pen, and even includes how to install air conditioning!
As the autumn leaves fall, so so our prices! All of our ebooks are 30% off!
Get Pet Rabbit Living Spaces for $9.99 $6.99! <----Click to buy now!
We also designed a 4-foot-wide rabbit pen/run with wheels. Both run designs have been added to the DIY Livestock Rabbit Housing e-book (and they are also in Ideal DIY Rabbit Cages, of course.)
Ideal DIY Rabbit Cages is our best deal; it combines everything in our other 2 rabbit housing books together, in one easy volume! Click HERE to find out more!

If you want all of our cage and rabbit run building information, check out our ebook:
DIY Livestock Rabbit Housing
This great ebook has tons of pictures, including all the tools and supplies you need to build everything. Whether if your buns are pampered pets, show divas, or if you ranch rabbits for livestock, this book has it all. Best yet: you can print off the pages you need to be a supply list for the hardware store, and an instruction manual out at the workbench when you are putting it together.
Ideal DIY Rabbit Cages combines all of the information in our other 2 books: Pet Rabbit Living Spaces and DIY Livestock Rabbit Housing.
As the autumn leaves fall, so do our prices! All of our ebooks are 30% off!
Get DIY Livestock Rabbit Housing for $12.99 $8.99! <----Click to buy now!
Don't want to build your own rabbit run? Check out these very cool exercise runs and pens perfect for your little friends:
- This pen is technically a dog exercise pen, but will work very well for your rabbit.
- Or, you could use an exercise pen manufactured by MidWest that can be enlarged with an extension kit.
Here are the Rabbit Run Plans
MATERIALS:
Frame:
- 1 inch Schedule 40 (or better yet - Sch. 80) PVC - 27 feet, cut as follows:
- 20" - 2 pc
- 22" - 2 pc
- 24" - 2 pc
- 90" - 2 pc
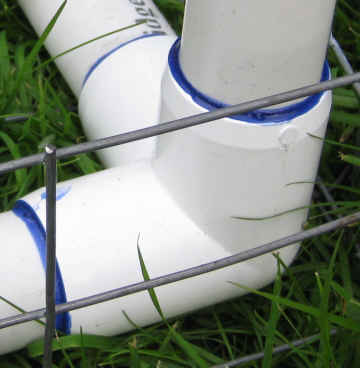
- Y-connectors - 4 (pictured)
- Red Hot Blue Glue
Wire:
- 2 in. x 4 in. galvanized wire (sometimes called hardware cloth). Wire measurements will be roughly 34 inches wide by 104 inches (8 ft 4 inches) long. Depending on the height of the roll of wire (I had some used stuff on hand), you may have to piece it together using J-clips)
- 1 in. x 2 in. x 36 in. galvanized wire. You’ll need approximately 22 feet (8 feet on both sides, and 26 inches at each end plus any losses from cutting). Cut it into manageable pieces if you wish, or try wrestling a long piece into submission
- J-clips, J-clip pliers, wire-cutters
- 1 clear panel corrugated plastic roofing (dimensions = 26 1/4 inches wide by 8 feet long)
- 3/4 in. or 7/8 in. wood dowel rod - 4 feet; cut into 4 lengths of 1 foot each
- 8 large metal washers
- 4 wood screws, 1 1/4 in. long
- Drill and bit
(If you cannot find cage wire, tools, and j-clips in your area, here and below are links to excellent tools and wire which might work for you.)
Cage Wire Options

If you want all of our cage and rabbit run building information, check out our ebook:
Ideal DIY Rabbit Cages for All Rabbits
This great ebook has tons of pictures, including all the tools and supplies you need to build everything. Whether if your buns are pampered pets, show divas, or if you ranch rabbits for livestock, this book has it all. Best yet: you can print off the pages you need to be a supply list for the hardware store, and an instruction manual out at the workbench when you are putting it together.
Ideal DIY Rabbit Cages combines all of the information in our other 2 books: Pet Rabbit Living Spaces and DIY Livestock Rabbit Housing.
As the autumn leaves fall, so do our prices! All of our ebooks are 30% off!
Get Ideal DIY Rabbit Cages for $18.99 $12.99! <----Click to buy now!
Build the PVC Frame for the Run

- Cut PVC to lengths specified in Materials. Sand any burrs.
- Glue according to diagram
- Note: one side is taller than the other, in order to allow for easy drainage in rainy weather. Be sure that the long legs are both at a skinny end, as the corrugation runs long-wise. Also, with one end shorter, you may find it easier to access your bunnies from the short end.
Either of these J-Clip Pliers is Top Quality - should last 20+ years
Use Flush Cut Wire Cutters to Avoid Wires Ending in Spears
Assemble Wire for Rabbit Run:
- Bend 4 inches of the bottom, 2" x 4" wire upward, all the way around the perimeter. Clip the overlap at the corners and fasten with J-Clips. This is to add stability, give more area for fastening the side wire, and to hopefully make the rabbit run a little bit more sturdy and predator-safe.
- Note: if you use livestock wire [4" x 4"] you will run a huge risk of escapees, even if only on the floor.
- Place the PVC frame in the basket you’ve formed with the 2" x 4" wire.
- Circle the PVC rabbit run frame with 1" x 2" x 36" wire. Fasten to the 2" x 4" floor wire liberally with J-Clips, at least every 4 inches.
It will be way too tall.
- Cut away wire at corners as shown in photo.
- Turn the rabbit run on its side.
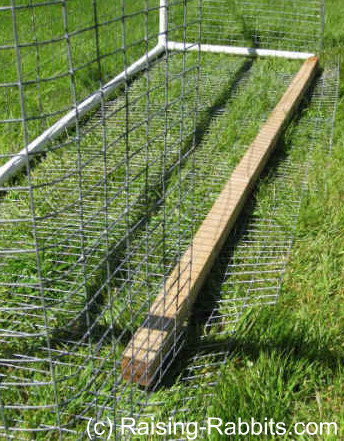
- Place a length 2 x 2 (or 2 x 4) board long enough to describe an imaginary line drawn from the top of a 24-inch leg to the top of a 20-inch leg. The board is only to provide you a straight edge against which to easily bend the wire upward (toward the middle of the rabbit run) forming a small portion of the roof.
- Cut and remove the extra wire, allowing for roughly 4 - 6 extra inches (see picture) to serve as a partial roof to support the corrugated panel
- Bend wire to 90 degrees.
- Repeat for the other side
- Bend the wire at the short ends of the rabbit run as well.
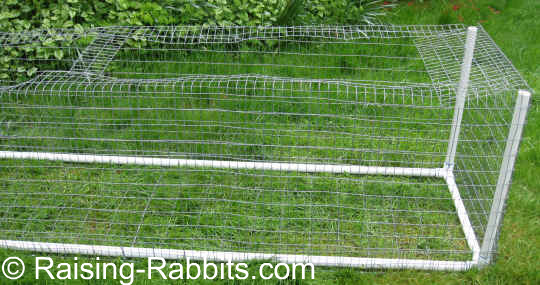
- From the discarded wire, cut a 4-inch wide strip to serve as a stabilizer across the top at the middle, and bend end wires to fasten tightly. See picture.
- The extra lengths of wire are to give stability to the corrugated plastic panel. It’d be rather wobbly without the wire to rest on. Bending it inward, will also, I hope, discourage curiosity from predators.
J-Clips - 1 pound or 2 pounds
Create the Roof for the Run:
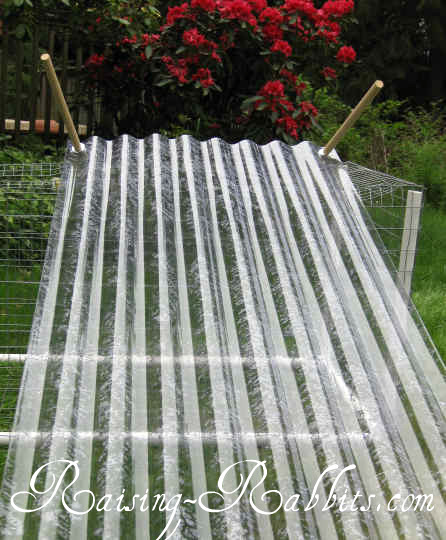
- Measure the distances between the PVC legs on-center, both lengthwise and width.
- Use these measurements to determine where to drill 4 holes in the corrugated panel, one at each corner.
- If you’ve used our measurements, you should be able to drill at the juncture of a 2-inch margin from the long ends and a 1 3/8-inch margin from the sides.
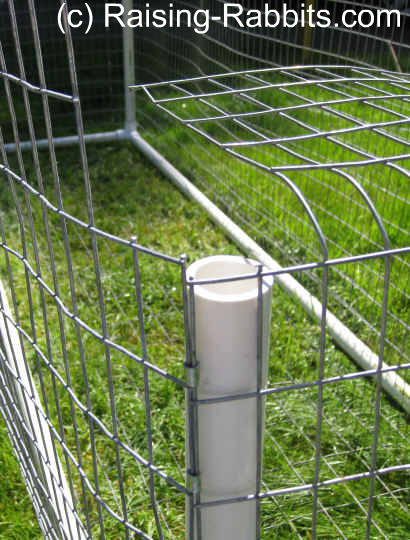
- Drill a pilot hole in one end of each of the four dowel rods
- Use 1 wood screw at each corner to attach a 1-foot length of dowel rod to a corner of the corrugated panel according to the picture:
- Washer
- Corrugated panel
- Washer
- Dowel
- We got the wood screws as tight as we possibly could, but you can see that the screws still protrude a bit from the dowel so the whole assembly is floppy. Tight - but floppy. Our pilot holes could have been bigger. But, we figure it is just fine this way, as the extra play makes it very easy to insert the dowels into the PVC legs.
- And that is the next step - turn over the corrugated plastic so the dowels point downward and insert the dowels into the PVC legs. Having foot-long dowels should make it harder for wind to lift the roof off the rabbit run.
- If you plan to let rabbits ‘live’ in the rabbit pen as you move it around your lawn every day, then you’ll probably need to add strapping across the top, such as bungee cords, so no curious and dexterous raccoon-hands can pry the top off for a ‘free’ meal.
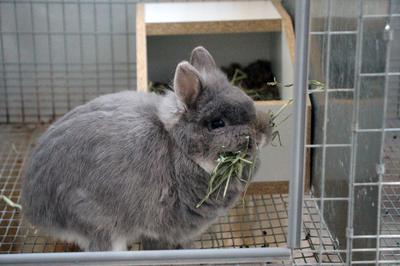
- Provide crocks for pellets and water, or do as we do - hang a J-feeder and use a 1-gallon Edstrom water tank, valve and tubing. Since the rabbits will have access to fresh green grass, their intake of pellets will drop significantly, as will their water intake. The fresh grass will provide lots of moisture.
- Since the PVC frame is light, you might also wish to drive tent pegs through the corners to fasten the rabbit run to the ground. Just another precaution in windy areas.
THERE, we’re done! All that probably took us a few hours, including the trip to the store to purchase parts.
As you use this run, don't forget...
- Predators
- Shade
Go to World of Raising-Rabbits to check out cage-building and other rabbit husbandry e-books by Raising-Rabbits.
Ready-Made Rabbit Runs
If you'd prefer to buy a very nice rabbit pen without the effort of constructing it, here are a couple very strong runs. The bottoms are open, making it easy for rabbits to nibble grass and forages (ensure no pesticide sprays!), but this also makes it easy for them to dig should they have a mind to do so.
Very Large Rabbit Pens
Double-Value Guarantee
Our policy is to always OVER-deliver
on value,
which is why your purchase is fully covered by our
Double-Value
Guarantee.
Go ahead - take any of our e-books for a test drive. Peruse our detailed informational and educational e-books. Examine our plans for building rabbit cages, runs, or metal or PVC hutch frames. Check out the Rabbit Husbandry info e-books.
If you aren't completely satisfied that your e-book purchase is worth at least double, triple or even quadruple the price you paid, just drop us a note within 45 days, and we'll refund you the entire cost. That's our Double-Value Guarantee.
Note: When you purchase your
e-books, they will be in PDF format, so you can download them to any device that
supports PDF format. We advise making a back-up copy to a drive or cloud
account. If the books are lost, you can also purchase another copy from Raising-Rabbits.
* Affiliate Links*
As an affiliate of several companies, including Amazon.com, we earn from qualifying purchases. Your purchases from these affiliates come at no extra cost to you.
Bunny Bazaar!
Online Shopping Mall by Raising-Rabbits!

One-Stop Shop for Rabbit Swag for both Buns and Humans
Bunny Branola!

The Ultimate
Rabbit Nutritional Supplement and Treat!
4 delicious flavors! Sample packs available!
Yes! I want more info!
Yes, Buy Bunny Branola Now!
Look What's NEW!!
Our very own classy
Raising Rabbits Sweatshirts, T-shirts, and Hoodies!
 |
 |
 |
.
We're now offering classy, unisex
Raising Rabbits
sweatshirts and hoodies,
Available in a great assortment of colors!
(We have unisex T-shirts too.)
Check out the Bunny Bazaar for our gorgeous
garments!
Order your own today!
They make great gifts too!!
Featured Rabbitries:
Click the Rabbitry Name Links:
Canada, Quebec
MapleRidge Stables Rabbitry
Himalayan Rabbits
Arizona
Hostile Hare
Chinchillas, Cages
Illinois
Open Doors Rabbitry
Lionheads, New Zealands
Kentucky
Goshen Bunnies
Holland Lop and Mini Plush Lop
New Jersey
Go Bunny Treats
All Natural Rabbit Treats
Mini Plush Lop Bunnies
All Natural Rabbit Treats
Belle's Bunny Boutique
Holland Lops & Mini Lion Lops
North Carolina
What The Fluffle Rabbitry
New Zealands, Champagnes
Breadbox Rabbitry
Netherland Dwarfs
The Farm at Fort Mill
Holland Lops
(Right across the South Carolina
border at Charlotte)
Pennsylvania
Happily Ever After
Mini Plush Lops, Holland Lops,
Netherland Dwarf, Lionhead,
Mini Plush Lop, & Mini Rex
Bunnies by Emma and Ellie
Holland Lop, Mini Lop,
Mini Plush Lop,
Mini Rex/Holland Lop Mix
Rhode Island
Shepherds Purse Rabbitry
Holland Lops
South Carolina
Jubilee Farms
Holland Lops
Washington
Cotton Candie Tails
Lionheads, Vienna-Marked
Subscribe to Rabbit Rhythms,
our e-newsletter !
Get rabbit news, husbandry and health tips mostly every month. It's easy - we only need your email address, then hit the 'subscribe' button. Enjoy!
Recent Articles
-
Mama Rabbit Preparing Her Babies Crib
Apr 25, 24 02:55 PM
 I caught my doe busy in her crib making occupation one day. She didn't care for my camera, and certainly seemed to feel uneasy in her mind that I should
 -
Raw Rabbit: Order raw frozen rabbit for pets
Mar 25, 24 07:45 PM
 Raw rabbit. Convenient online ordering of raw frozen rabbit as whole prey, partially processed, or ground, for feeding pets species-appropriate meals
 -
Farm at Fort Mill
Mar 01, 24 03:22 PM
 Farm at Fort Mill has moved. It is now Jubilee Farms Holland Lops, part of Edgemoor Equestrian, in Edgemoor SC. They offer riding lessons and host events.
Raising-Rabbits: Home of
The Rabbit Raising Problem Solver

$22.62 - includes
- 10% off your autographed copy of Rabbit Raising Problem Solver
- All packaging, handling, and Media Mail postage costs (WA residents are subject to sales tax)
- Applies to US addresses - (sadly, Media Mail is not offered for international shipping, not even for really awesome books)
- (International shipping is available, of course, but it's out of our control how much they charge for shipping. Send us your country, city, and area code to obtain a shipping quote.)
* Affiliate Links*
As an affiliate of several companies, including Amazon.com, we earn from qualifying purchases. Your purchases from these affiliates come at no extra cost to you.

New! Comments
Have your say about what you just read! Leave me a comment in the box below.